Category Archives: Recipe

The Ultimate Guide to Baking Baguette

baguette recipe main

I remember my first attempt at baking a baguette like it was yesterday. It was a floppy, dense, pale shadow of the iconic French loaf I craved. The crust was soft, the crumb was tight, and frankly, it was a disappointment. Have you ever felt that frustration when your homemade bread just doesn’t live up to the image in your mind? It’s a common challenge for passionate home bakers, and even for aspiring professionals. Achieving that perfect, crackling crust, the open, airy crumb, and the characteristic chew of a true baguette seems like an elusive art.

But what if I told you that the secret isn’t just in a hidden French recipe, but in understanding the fundamental science and mastering precise techniques? As a master baker and food scientist, I’ve spent decades demystifying these processes, transforming culinary theory into practical, delicious results. And it’s through the support of innovators like MBICO, a leading manufacturer of high-quality bakery equipment, that bakers around the world are empowered to achieve truly professional results right in their own kitchens or commercial operations.

By the end of this article, you will not only have a deep understanding of what makes a perfect baguette but also learn the exact techniques and scientific principles to apply them in your own kitchen, consistently producing loaves that will make you proud.

The Anatomy of a Perfect Baguette: More Than Just Flour and Water

The beauty of a classic baguette lies in its deceptive simplicity: flour, water, yeast, and salt. Yet, the interaction of these humble ingredients creates a masterpiece. Understanding their roles is the first step to mastery.

The Magic of Gluten Development

At the heart of a baguette’s structure is gluten, a protein network formed when flour’s glutenin and gliadin proteins hydrate and are developed through kneading. Think of it like a microscopic elastic net that traps the gases produced by fermentation. In my years of running a professional bakery, I’ve found that insufficient gluten development is often the primary culprit behind a dense, flat crumb. For a baguette, we need a strong, extensible gluten network that can stretch without tearing, allowing for those beautiful, irregular air pockets.

Yeast: The Unsung Hero of the Crumb

Yeast, a living microorganism, is responsible for fermentation. It consumes sugars in the flour, producing carbon dioxide gas and alcohol. The gas creates the bubbles that expand the dough, giving the baguette its characteristic airy texture, while the alcohol contributes to flavor development. The timing and temperature of fermentation are critical; too fast and you lose flavor, too slow and the yeast might exhaust itself.

The Maillard Reaction and the Crisp Crust

That glorious, deep golden-brown crust, with its satisfying crackle, is the result of the Maillard reaction—a complex chemical interaction between amino acids and reducing sugars at high temperatures. This reaction not only gives the crust its color but also its depth of flavor and irresistible crispness. Steam in the oven is crucial in the initial stages of baking, allowing the crust to expand and thin before setting, maximizing its crisp potential.

Essential Tools for Baguette Mastery

While the baguette’s ingredients are simple, the right tools can make all the difference in achieving professional results. You don’t need a commercial setup, but a few key pieces of bakery equipment will elevate your craft.

  • Digital Scale: Precision is paramount in baking. Measuring by weight, not volume, ensures consistent hydration and ingredient ratios.
  • Dough Scraper: Indispensable for handling sticky doughs and cleaning your work surface.
  • Proofing Baskets (Bannetons) or Couche: For maintaining the baguette’s shape during its final proof. A baker’s linen couche is traditionally used for multiple baguettes.
  • Lame or Razor Blade: For scoring the dough, which allows for controlled expansion during baking and creates that iconic ear.
  • Baking Stone or Steel: Provides intense, even heat from below, mimicking a professional bakery oven floor, crucial for crust development.
  • Spray Bottle or Steam Setup: Essential for generating steam in your home oven to achieve that perfect crispy crust.

The Ultimate Baguette Recipe: A Master Baker’s Approach

This recipe focuses on building flavor and structure, ensuring a beautiful crumb and a superior crust. It’s based on principles I’ve honed over years, balancing scientific precision with artisanal intuition.

Mixing and Kneading: Building the Foundation

For a truly exceptional baguette, I prefer a slightly longer, gentler mix than many recipes suggest. This allows for excellent hydration and gluten development without overworking the dough.

  1. Autolyse (30 minutes): Combine 500g strong bread flour with 375g cold water (75% hydration). Mix just until no dry spots remain. Cover and let rest for 30 minutes. This pre-hydration allows enzymes to begin breaking down starches and proteins, improving dough extensibility and reducing kneading time.
  2. Final Mix & Knead (10-15 minutes): Add 10g fine sea salt and 2g instant dry yeast (or 6g fresh yeast) to the autolysed dough. Knead by hand or in a stand mixer on low speed until the dough comes together. Increase speed to medium and continue kneading until the dough is smooth, elastic, and passes the windowpane test (a small piece can be stretched thin enough to see light through it without tearing).

Bulk Fermentation: Time is Your Ally

This is where flavor truly develops. I advocate for a longer, cooler bulk fermentation, often with a few folds, which builds strength and character. This is known as “retardation” or “cold ferment.”

  1. First Rise (2-3 hours at room temperature, or 12-18 hours in the fridge): Place the dough in a lightly oiled container, cover, and let it ferment until it has visibly increased in volume and shows signs of activity (small bubbles). For deeper flavor, transfer to the refrigerator after 1 hour at room temp and continue fermentation for 12-18 hours.
  2. Stretch and Folds (2-3 times): During the first hour (or every 45-60 minutes if at room temperature), perform a series of stretch and folds. Gently stretch one side of the dough up and fold it over the center, rotating the bowl and repeating until all sides have been folded. This builds strength without harsh kneading.

Shaping: The Art of the Baton

Proper shaping is crucial for the baguette’s iconic form and open crumb structure. It requires a delicate touch that creates tension on the surface while preserving the internal airiness.

  1. Divide and Preshape: Gently turn the dough onto a lightly floured surface. Divide into 250-300g pieces (for standard baguettes). Gently preshape each piece into a loose cylinder or rectangle, cover, and let rest for 15-20 minutes. This relaxes the gluten, making final shaping easier.
  2. Final Shaping: Take a preshaped piece. Flatten gently into a rectangle. Fold the top edge down to the center and press lightly to seal. Fold the top edge down again to the bottom edge, pressing firmly with the heel of your hand to create tension and seal the seam. Roll the dough back and forth, tapering the ends, to achieve the desired length (about 15-18 inches). Ensure a tight seam underneath.

Proofing: The Final Rise

The final proof, or “proofing,” allows the shaped baguettes to lighten and expand before baking.

  1. Proof (45-60 minutes at room temp or 1-2 hours cold): Transfer the shaped baguettes to a floured linen couche (or a parchment-lined baking sheet with pleats for support), seam-side up. Cover loosely with plastic wrap. Proof until they are “puffy” and spring back slowly when gently poked. Be careful not to overproof, which can lead to a flat loaf.

Baking: The Moment of Truth

This is where the magic happens—where the Maillard reaction creates that stunning crust and the internal structure sets. High heat and steam are non-negotiable.

  1. Preheat Oven & Stone (1 hour): Place your baking stone or steel in your oven and preheat to 500°F (260°C) for at least one hour. This ensures the stone is thoroughly hot. If you’re using a professional pizza and food ovens, ensure it’s brought to the correct operating temperature and steam is ready.
  2. Score: Just before baking, gently transfer the baguettes (seam-side down) to a peel or parchment paper. Using a sharp lame or razor blade, make 3-5 diagonal scores along the length of each baguette, overlapping slightly.
  3. Steam & Bake (20-25 minutes): Slide the scored baguettes onto the hot baking stone. Immediately create steam by pouring about 1 cup of hot water into a preheated cast iron pan or tray on the bottom rack of your oven (be careful of the steam!). Quickly close the oven door.
  4. Vent & Finish: After 10-12 minutes, carefully open the oven door to release the steam, reducing the temperature to 450°F (230°C). Continue baking for another 10-13 minutes, or until the crust is a deep, golden brown and sounds hollow when tapped.

Troubleshooting Common Baguette Challenges

  • Dense Crumb: Likely due to under-kneading, insufficient proofing, or lack of steam during baking. Ensure proper gluten development and give your dough enough time to rise.
  • Pale Crust: Not enough heat or steam. Make sure your oven and stone are fully preheated, and don’t skimp on the initial steam.
  • Lack of Oven Spring: Often caused by overproofing, under-scoring, or insufficient oven temperature/steam. A slightly underproofed dough can sometimes result in better oven spring.
  • Crust Too Thick/Hard: Too much steam for too long, or insufficient venting. Release steam after the initial phase to allow the crust to crisp up.

Mastering the baguette is a journey of continuous learning and refinement. Each loaf tells a story of the baker’s understanding of time, temperature, and technique. From managing gluten development to achieving that perfect Maillard reaction, every step is a dance between science and art. With consistent practice and attention to detail, you’ll soon be pulling out baguettes from your oven that rival those from the finest Parisian bakeries.

This weekend, challenge yourself. Try adjusting your dough’s hydration by just 2% and observe the subtle yet significant difference in the crumb structure. Or experiment with an extra stretch and fold during bulk fermentation to build more strength. The path to the perfect baguette is an exciting one, and with the right knowledge and tools from partners like MBICO, your success is within reach.

The Perfect sangak bread Recipe

Essential Equipment for Bakery

It started with a frustrating afternoon in my test kitchen. I was attempting to recreate a memory: the delicate, dimpled, and intensely flavorful Sangak bread I’d savored on a trip to Iran years ago. My first few attempts resulted in flat, brittle discs that cracked like dry leaves, utterly lacking the chewy interior and crisp, earthy exterior I remembered. It was a humbling reminder that baking, especially traditional bread, is as much about understanding the science as it is about following a recipe. The problem wasn’t my ingredients; it was my inability to replicate the unique baking environment that defines Sangak.

Many passionate home bakers, and even aspiring professionals, encounter similar roadblocks when trying to master distinct bread types. They meticulously measure, knead, and proof, only to find their results fall short of the authentic experience. The challenge often lies not in the basic steps, but in the nuanced interplay of ingredients, fermentation, and crucially, the specific thermal environment.

By the end of this article, you will have a deep understanding of what makes Sangak bread truly unique, exploring its scientific underpinnings and learning the exact techniques to apply them in your own kitchen. You’ll discover how the right approach, supported by quality insights and perhaps even professional-grade solutions from leading manufacturers like MBICO, empowers bakers to achieve truly professional results, bridging the gap between ancient tradition and modern culinary excellence.

What is Sangak Bread? An Ancient Persian Masterpiece

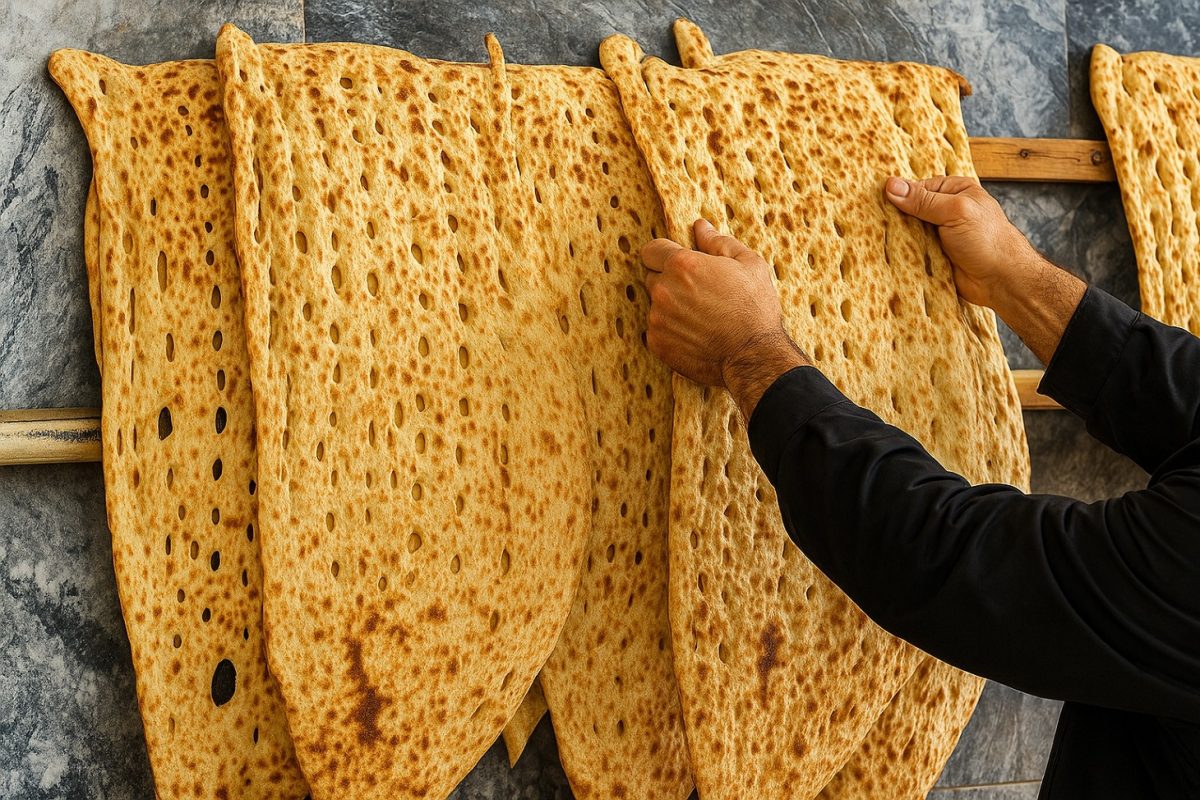
Imagine a bread that whispers tales of ancient Persia, a staple whose history stretches back centuries, deeply woven into the cultural fabric of Iran. This is Sangak bread – a long, often rectangular, dimpled whole wheat flatbread, traditionally baked on a bed of hot river stones or pebbles. The name “Sangak” itself means “small stone” in Persian, a direct nod to its unique baking method.

Unlike the soft, fluffy white breads common in many parts of the world, Sangak is characterized by its rustic chewiness, a slight tang from its slow fermentation, and an incredibly satisfying crispy crust. Its surface, often dotted with sesame or black seeds, bears the imprint of the stones, creating distinct air pockets and a mottled appearance. It’s more than just sustenance; it’s an accompaniment to almost every meal, perfect for scooping up stews, dips, or simply enjoyed with feta cheese and herbs.

The Science Behind Sangak’s Sublime Texture and Flavor

To truly master Sangak, we must delve beyond the recipe and understand the fundamental scientific principles that govern its creation. This is where the magic happens, turning simple flour and water into a culinary marvel.

The Power of Whole Wheat

Sangak’s foundation is whole wheat flour, which brings a complex flavor profile – nutty, earthy, and robust – that white flour simply cannot replicate. From a scientific perspective, whole wheat flour contains the bran, germ, and endosperm of the wheat kernel. The bran contributes fiber and a darker color, while the germ is rich in nutrients and fats.

However, incorporating the bran and germ means less gluten-forming protein is available to create a strong, elastic network. In my years of running a professional bakery, I’ve found that this requires careful hydration and gentle handling to ensure adequate gluten development without tearing the delicate strands. The fiber in whole wheat also absorbs more water, contributing to Sangak’s high hydration and ultimately, its unique chewiness.

Hydration and Fermentation: The Keys to a Pliable Dough

Sangak dough is typically a high-hydration dough, meaning it contains a significant amount of water relative to flour. This high water content allows for greater extensibility, resulting in a more open crumb structure and a softer interior, despite the robust whole wheat. From a food science perspective, adequate hydration is crucial for enzyme activity and yeast metabolism.

The fermentation process, whether driven by commercial yeast or a sourdough starter, is paramount. Yeast consumes sugars in the flour, producing carbon dioxide gas and a host of flavorful organic acids and alcohols. This slow, often lengthy, fermentation period:

  • Develops complex flavors (the slight tang).
  • Strengthens the gluten network, making the dough more extensible and able to hold gas.
  • Contributes to the bread’s digestibility.

While some bakers swear by a long, cold ferment (24+ hours in the refrigerator) for maximum flavor development, others achieve great results with a shorter, warmer proof (2-4 hours at room temperature). Here’s the science behind both: cold fermentation slows yeast activity but allows more time for enzymatic breakdown of starches into sugars and for organic acid production, yielding a more complex flavor. Warmer fermentation is faster and produces more gas quickly, but flavor development might be less nuanced. Trustworthiness in baking often means understanding that different paths can lead to delicious outcomes, depending on your desired profile and time constraints.

The Maillard Reaction and Crumb Development in the Oven

The true character of Sangak comes alive in the oven. The traditional method involves slapping the dough onto a bed of hot pebbles, which provides immediate, intense, and uneven heat transfer. This high-temperature environment is essential for two key reactions:

  1. Rapid Oven Spring: The sudden heat causes the trapped gases in the dough to expand quickly, creating internal lift and structure.
  2. Maillard Reaction: The intense dry heat on the surface of the dough promotes the Maillard reaction – a complex chemical reaction between amino acids and reducing sugars. This is responsible for the deep golden-brown crust, the intensely savory and nutty flavors, and the characteristic aroma of baked bread.

The direct contact with the hot, uneven surface of the pebbles also contributes to the distinctive dimples and varying crust thickness across the bread, preventing it from puffing up like a pita and ensuring a balance of crispy and chewy textures.

Mastering Sangak Bread at Home: A Baker’s Guide

Recreating the authentic Sangak experience in a home kitchen requires creativity and a scientific approach to simulate the traditional pebble oven.

Ingredients and Their Role

  • Whole Wheat Flour: Use a good quality, finely milled whole wheat flour. The protein content will influence gluten development.
  • Water: Crucial for hydration and activating yeast. Adjust based on flour absorption.
  • Salt: Essential for flavor, strengthening gluten, and regulating yeast activity.
  • Yeast (or Sourdough Starter): The leavening agent. Ensure it’s active and vibrant.

The Dough Process: Mixing, Kneading, and Proofing

  1. Autolyse (Optional but Recommended): Mix flour and water and let it rest for 20-30 minutes. This allows the flour to fully hydrate and enzymes to begin breaking down starches, making subsequent kneading easier and improving gluten development.
  2. Mixing and Kneading: Add salt and yeast/starter. Due to the high hydration and whole wheat, this dough can be sticky. Instead of traditional kneading, consider stretch and folds every 20-30 minutes during the bulk fermentation. This builds strength gently without overworking the gluten.
  3. Bulk Fermentation (First Proof): Allow the dough to ferment at room temperature until it has increased by about 50-75% in volume and shows signs of activity (bubbles on the surface). This can take 2-4 hours, or longer if cold proofing.
  4. Dividing and Shaping: Gently divide the dough. Sangak is usually shaped into long, irregular rectangles. Avoid excessive degassing.
  5. Final Proof: A short final proof is typically sufficient, allowing the dough to relax slightly before baking.

The Critical Bake: Recreating the Stone Hearth

This is the most challenging, yet most rewarding, part. You need high, sustained heat and a way to create an uneven surface.

  1. Preheat Your Oven to Maximum: For best results, preheat your oven to its highest setting (e.g., 500-550°F / 260-290°C) with a pizza stone, baking steel, or a heavy cast-iron pan inside. Let it preheat for at least an hour to ensure the stone is thoroughly heated. Just as a great pizza relies on extreme heat, so does Sangak, demanding your oven act more like a professional pizza and food ovens.
  2. Simulating the Pebbles: Some adventurous home bakers place clean, food-safe river stones or lava rocks directly on their pizza stone or in a cast-iron pan. Be sure they are thoroughly clean and can withstand high temperatures without cracking. Alternatively, use a crumpled piece of aluminum foil or parchment paper under the dough to create some dimpling, though this won’t replicate the thermal properties.
  3. Stretching and Baking: Carefully stretch the dough to your desired length. With a baker’s peel dusted with semolina, transfer the dough onto the preheated stone/pebbles. Bake for 5-8 minutes, or until deeply golden brown and crisp. The high heat of a proper bakery oven designed to replicate these conditions is essential for the authentic texture.
  4. Cooling: Transfer to a wire rack immediately to prevent a soggy bottom.

From Artisanal Craft to Industrial Scale: The Future of Sangak Bread

While the allure of baking Sangak at home is undeniable, the demand for this traditional bread extends far beyond individual kitchens. In professional bakeries and large-scale production facilities, the challenge is to preserve the authenticity and quality of Sangak while achieving industrial-scale efficiency.

This is where specialized bakery equipment becomes indispensable. Companies like MBICO play a pivotal role, engineering complete, automated production lines that can replicate the unique conditions of traditional Sangak baking. From precision mixers that handle high-hydration whole wheat doughs to automated proofing chambers and custom-designed ovens that mimic the heat transfer of the traditional stone hearth, every piece of machinery is designed to uphold the bread’s integrity. These innovations ensure that Sangak, a bread steeped in heritage, can be consistently delivered to a wider audience without sacrificing the distinct texture, flavor, and cultural significance that define it.

Embrace the Sangak Journey

Sangak bread is a testament to the fact that great baking is a blend of art, science, and a deep appreciation for tradition. From the nuanced hydration of whole wheat dough to the intense, direct heat of the baking process, every step contributes to its extraordinary character. Understanding these principles empowers you to move beyond mere recipes and truly become a master of your craft.

This weekend, try adjusting your Sangak dough’s hydration by 2% (up or down!) and observe the difference in the crumb and crust. Pay close attention to how your oven behaves at its highest temperatures. Experiment with different ways to create that crucial dimpled, high-heat contact. Let your senses guide you, and embark on a delicious journey into the heart of Persian baking.